3. Robot Visualization
3.1. Overview
For the robot visualization in Slicer 3D, one first need to properly configure a robot in ROS 2. The default ROS approach requires:
an XML robot definition file (
UFA) and usually CAD files for the links.a robot state publisher node which will make the URDF description available as a ROS parameter for other nodes. The robot state publisher will also compute the forward kinematics and broadcast the 3D position of each link to tf2.
a source (publisher) for the current joint positions. This can be an actual robot driver or a script emulating the robot.
Once the ROS robot is setup properly, the SlicerROS2 robot node can be used to visualize the robot in Slicer. Internally, the robot node will use a parameter node to retrieve the URDF description and tf2 lookups to refresh the position of each link.
3.2. ROS Robot
The following are examples of robots we’ve used to test the SlicerROS2
module. They cover a serial robot (Phantom Omni) as well as a robot
with parallel linkages (dVRK PSM). The SlicerROS2 module should work
with any other robots as long as the links CAD files are either
.stl or .obj.
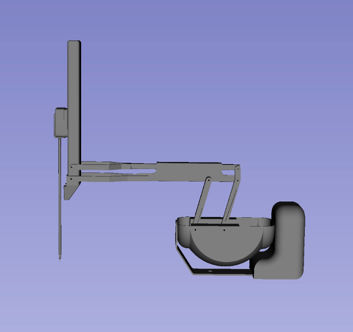
3.2.1. Phantom Omni
The Phantom Omni is an entry level haptic device initially sold by Sensable. Later on, it has been renamed Geomagic Touch or 3DS Touch. The initial version used a FireWire connection. Later models used Ethernet and more recently USB.
We created and used a ROS package for the Phantom Omni: Omni Github
Link. This
package has no external dependencies and is very light so it’s a good
way to test the SlicerROS2 module. You can download this repository
in your ROS 2 workspace’s source directory and then build. Always
remember to use colcon build followed by source
install/setup.bash when you downloaded a new package to src.
This package contains the URDF, STL meshes, a launch file for the
robot_state_publisher as well as a dummy script that publishes a
joint trajectory so one can see the arm moving around.
To start the robot_state_publisher, use:
ros2 launch sensable_omni_model omni.launch.py
Then, to start the robot’s dance, use an other terminal:
ros2 run sensable_omni_model pretend_omni_joint_state_publisher
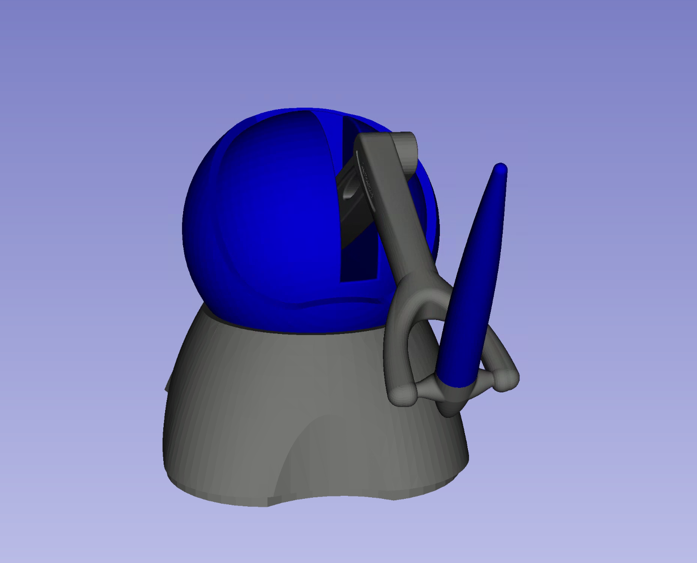
3.2.2. dVRK PSM
The dVRK PSM (da Vinci Research Kit Patient Side Manipulator) is based on the first generation da Vinci RAMIS system (Robotically Assisted Minimally Invasive Surgery) sold by ISI (Intuitive Surgical systems).
Installing the dVRK code base is not too difficult but it will take a few minutes to compiled. You can find the build instructions for ROS 2 on the dVRK Wiki.
Once you’ve compiled all the dVRK related packages, you will need 3 terminals to launch the following nodes:
# simulated PSM
ros2 run dvrk_robot dvrk_console_json -j ~/ros2_ws/src/cisst-saw/sawIntuitiveResearchKit/share/console/console-PSM1_KIN_SIMULATED.json

# robot state publisher
ros2 launch dvrk_model dvrk_state_publisher.launch.py arm:=PSM1

# test script, make the PSM1 move around
ros2 run dvrk_python dvrk_arm_test.py -a PSM1
3.2.3. Cobot
We also tested SlicerROS2 on myCobot by Elephant Robotics, specifically the myCobot 280 M5 Stack. The ROS 2 interface for the device can be found here and drivers can be installed from the Elephant Robotics website.
Assuming the interface (mycobot_ros2) is cloned under the same
ros2_ws, the state publisher can be started using the following steps:
cd ~/ros2_ws/src/mycobot_ros2/src/mycobot_ros2/mycobot_280/mycobot_280/config
python3 listen_real.py
It’s possible that you will need to change the port specified on line
14 of listen_real.py depending on your device. The .dae files
in the robot description also need to be converted to STLs (an online
converter will work) and the paths in the URDF file should be updated
to reflect this change.
Once running - make sure your robot is in Transponder Mode. More instructions for basic operation of the myCobot can be found in the Gitbook
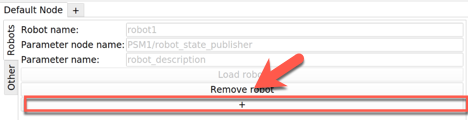
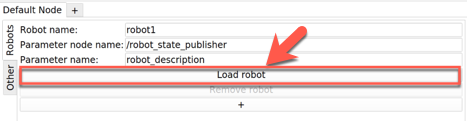
3.3. Slicer Robot
We’ve simplified loading the robot by adding some shortcuts on the
widget UI. The default parameter node name: /robot_state_publisher
and parameter name: robot_description should work for most
cases. These are set as the default in the UI. To load a robot with
these parameters, press the “Load Robot” button:
At that point, the robot’s model should be loaded and displayed in
Slicer. To do this addition programmatically, please see the
documentation on the vtkMRMLROS2RobotNode. Note that if your robot
uses a namespace, you will likely need to prefix this on the parameter
node name. The PSM for example requires
PSM1/robot_state_publisher.
To remove the robot from the scene you can press the “Remove Robot” button.
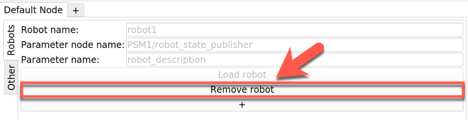
To add more than one robot, you can press the “+” button and the widget will update with additional line edits for the second robot.